

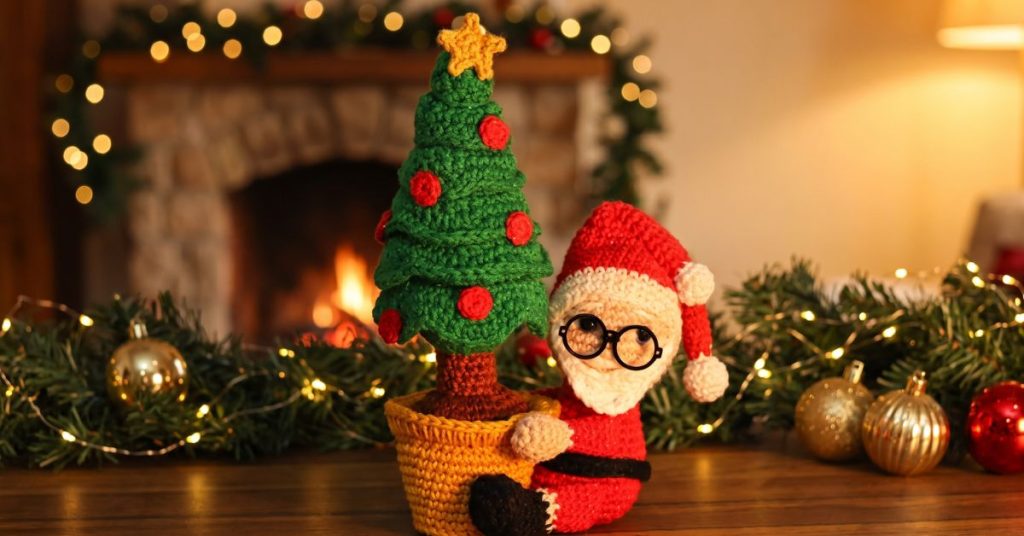
I stumbled across this pattern while scrolling through amigurumi designs one evening, and something about the little bearded Santa perched next to his tiny Christmas tree stopped me mid-scroll.
Maybe it was the cozy, handmade look of it, or maybe it was just that it felt like the perfect antidote to another year of mass-produced holiday decor, either way, I knew I had to make it myself.
Materials
Circulo Yarns – Amigurumi (1 ball each)
- #7569 Brownie
- #8001 White
- #7567 Cocoa
- #7563 Chantilly
- #8990 Black
Circulo Yarns – Amigurumi Sparkle (1 ball each)
- #3528 Carmine
- #7030 Mustard
- #5767 Brazilian Green
- #8001 White
Other supplies
- Crochet hook, size C
- Blue safety eyes, 8mm
- Plastic sheet
- Tapestry needle
- Polyester stuffing
- Locking stitch markers
- Optional: fabric glue and mini (1.5″) plastic glasses
Size: Christmas tree 8″ · Santa Claus 5.5″ Level of difficulty: ●●○ (Intermediate)
Stitch Glossary & Abbreviations
| Abbreviation | Meaning |
|---|---|
| st | stitch |
| sk | skip |
| ch | chain |
| sl st | slip stitch |
| sc | single crochet |
| Bpsc | back post single crochet |
| esc | elongated single crochet |
| hdc | half double crochet |
| dc | double crochet |
| inc | increase (2 sc in the same base stitch) |
| dec | invisible decrease (insert hook into the front loops of the next 2 sts, yo, pull through 2 loops, yo, pull through 2 loops) |
| rnd/R | round |
Santa Claus — Body and Head
Worked continuously, in the round. Close each round with 1 sl st unless noted.
Body — use Amigurumi Sparkle #3528 Carmine
Make a magic ring.
| Round | Instruction | Stitch count |
|---|---|---|
| R1 | 6 sc inside the magic ring | 6 sc |
| R2 | 6 inc | 12 sc |
| R3 | (1 sc, 1 inc) around | 18 sc |
| R4 | (2 sc, 1 inc) around | 24 sc |
| R5 | (3 sc, 1 inc) around | 30 sc |
| R6 | (4 sc, 1 inc) around | 36 sc |
| R7–11 | sc around (5 rounds) | 36 sc |
| R12 | (4 sc, 1 dec) around | 30 sc |
| R13 | (3 sc, 1 dec) around | 24 sc |
| R14 | sc around | 24 sc |
| R15 | (6 sc, 1 dec) around | 21 sc |
| R16 | sc around | 21 sc |
| R17 | (5 sc, 1 dec) around | 18 sc |
| R18 | sc around | 18 sc |
Insert stuffing into the body.
Head — switch to color #7563 Chantilly
| Round | Instruction | Stitch count |
|---|---|---|
| R19 | (1 sc, 1 inc) around | 27 sc |
| R20 | (2 sc, 1 inc) around | 36 sc |
| R21–28 | sc around (8 rounds) | 36 sc |
Attach the safety eyes between R25 and R26, 6 stitches apart. Note: Santa’s eyes look to the side — see reference photo.
| Round | Instruction | Stitch count |
|---|---|---|
| R29 | (4 sc, 1 dec) around | 30 sc |
| R30 | (3 sc, 1 dec) around | 24 sc |
Insert stuffing into the head.
| Round | Instruction | Stitch count |
|---|---|---|
| R31 | (2 sc, 1 dec) around | 18 sc |
| R32 | (1 sc, 1 dec) around | 12 sc |
| R33 | 6 dec | 6 sc |
Thread the tapestry needle and weave through the front loop of each stitch in the last round; pull taut to close.
Face details (color #7563 Chantilly): embroider the nose between R23 and R24 with 2 stitches.
Face details (color #8001 White): embroider the mustache between R22 and R23 with 4 stitches. Embroider the eyebrows diagonally onto R27 with 3 stitches each.
Beard — color #8001 White
Crochet back and forth.
- Ch 2.
- R1: Sk 1 ch, 1 inc, 1 ch = 2 sc, turn.
- R2: 2 inc, 1 ch = 4 sc, turn.
- R3: Ch 2 (counts as 1 hdc), 1 hdc in the same base st, 2 sc, 2 hdc in the same base st, ch 7 = 13 sts, turn.
- R4: Sl 1 ch, 6 sc into chains, 1 hdc, 1 sc, 2 sl sts, 1 sc, 1 hdc, ch 7, sk 1 ch, 6 sc = 18 sts.
Do not cut the yarn — work around the sides of the beard along R4–R1: 1 inc into each turning chain, then 4 sc along the side of R1–R4.
Fasten off and sew onto the head as shown in the reference photo.
Santa Hat
Start with Amigurumi Sparkle #8001 White
Make a magic ring.
| Round | Instruction | Stitch count |
|---|---|---|
| R1 | 6 sc inside the magic ring | 6 sc |
| R2 | 6 inc | 12 sc |
| R3–5 | sc around (3 rounds) | 12 sc |
Insert stuffing.
| Round | Instruction | Stitch count |
|---|---|---|
| R6 | 6 dec | 6 sc |
Switch to color #3528 Carmine
| Round | Instruction | Stitch count |
|---|---|---|
| R7 | (1 sc, 1 inc) around | 9 sc |
| R8 | (2 sc, 1 inc) around | 12 sc |
| R9 | sc around | 12 sc |
| R10 | (3 sc, 1 inc) around | 15 sc |
| R11 | sc around | 15 sc |
| R12 | (4 sc, 1 inc) around | 18 sc |
| R13 | sc around | 18 sc |
| R14 | (5 sc, 1 inc) around | 21 sc |
| R15 | sc around | 21 sc |
| R16 | (6 sc, 1 inc) around | 24 sc |
| R17 | sc around | 24 sc |
| R18 | (7 sc, 1 inc) around | 27 sc |
| R19 | sc around | 27 sc |
| R20 | (8 sc, 1 inc) around | 30 sc |
| R21 | sc around | 30 sc |
| R22 | (9 sc, 1 inc) around | 33 sc |
| R23 | sc around | 33 sc |
| R24 | (10 sc, 1 inc) around | 36 sc |
| R25 | sc around | 36 sc |
| R26 | (11 sc, 1 inc) around | 39 sc |
Switch to Amigurumi Sparkle #8001 White
| Round | Instruction | Stitch count |
|---|---|---|
| R27–29 | sc around (3 rounds) | 39 sc |
Fasten off, leaving a tail, and sew the hat onto the head. Use black yarn to sew on the glasses.
Arms (make 2)
Use color #7563 Chantilly
Crochet in the round. Make a magic ring.
| Round | Instruction | Stitch count |
|---|---|---|
| R1 | 6 sc inside the magic ring | 6 sc |
| R2 | 6 inc | 12 sc |
| R3–4 | sc around (2 rounds) | 12 sc |
| R5 | (1 sc, 1 dec) around | 8 sc |
Insert stuffing into the hand.
Switch to Amigurumi Sparkle #8001 White
| Round | Instruction | Stitch count |
|---|---|---|
| R6 | sc around | 8 sc |
Switch to Amigurumi Sparkle #3528 Carmine
| Round | Instruction | Stitch count |
|---|---|---|
| R7–12 | sc around (6 rounds) | 8 sc |
Insert stuffing until half full. Flatten the piece and close the gap with 4 sc. Fasten off.
Sew the arms onto the body between R12 and R16, as shown in the reference photo.
Legs (make 2)
Use color #8990 Black
Make a magic ring.
| Round | Instruction | Stitch count |
|---|---|---|
| R1 | 6 sc inside the magic ring | 6 sc |
| R2 | 6 inc | 12 sc |
| R3 | (1 sc, 1 inc) around | 18 sc |
| R4 | 18 Bpsc | 18 sc |
| R5 | sc around | 18 sc |
| R6 | 3 sc, 6 dec, 3 sc | 12 sc |
Insert stuffing into the foot.
| Round | Instruction | Stitch count |
|---|---|---|
| R7 | 4 sc, 2 dec, 4 sc | 10 sc |
| R8 | sc around | 10 sc |
Switch to Amigurumi Sparkle #8001 White
| Round | Instruction | Stitch count |
|---|---|---|
| R9 | sc around | 10 sc |
Switch to Amigurumi Sparkle #3528 Carmine
| Round | Instruction | Stitch count |
|---|---|---|
| R10–14 | sc around (5 rounds) | 10 sc |
Insert stuffing until half full. Flatten the piece and close the gap with 5 sc. Fasten off.
Sew the legs onto the body between R5 and R9, as shown in the reference photo.
Belt — color #8990 Black
- Ch 37.
- R1: Sk 1 ch, 36 sc.
Fasten off, leaving a tail. Sew the belt onto the body as shown in the reference photo.
Christmas Tree
Use Amigurumi Sparkle #5767 Brazilian Green
Join the yarn into the foundation chain of the trunk.
| Round | Instruction | Stitch count |
|---|---|---|
| R1 | 12 inc | 24 sc |
| R2 | (3 sc, 1 inc) around | 30 sc |
| R3 | (4 sc, 1 inc) around | 36 sc |
| R4 | (5 sc, 1 inc) around | 42 sc |
| R5 | 42 Bpsc | 42 sc |
| R6 | (12 sc, 1 dec) | 39 sc |
| R7 | sc around | 39 sc |
| R8 | (11 sc, 1 dec) | 36 sc |
| R9 | sc around, back loop only | 36 sc |
| R10 | (10 sc, 1 dec) | 33 sc |
| R11 | sc around | 33 sc |
| R12 | (9 sc, 1 dec) | 30 sc |
Insert stuffing into the tree and trunk.
| Round | Instruction | Stitch count |
|---|---|---|
| R13 | sc around, back loop only | 30 sc |
| R14 | (8 sc, 1 dec) | 27 sc |
| R15 | sc around | 27 sc |
| R16 | (7 sc, 1 dec) | 24 sc |
| R17 | sc around, back loop only | 24 sc |
| R18 | (6 sc, 1 dec) | 21 sc |
| R19 | sc around | 21 sc |
| R20 | (5 sc, 1 dec) | 18 sc |
| R21 | sc around, back loop only | 18 sc |
| R22 | (4 sc, 1 dec) | 15 sc |
| R23 | sc around | 15 sc |
Insert stuffing.
| Round | Instruction | Stitch count |
|---|---|---|
| R24 | (3 sc, 1 dec) | 12 sc |
| R25 | sc around, back loop only | 12 sc |
| R26 | (2 sc, 1 dec) | 9 sc |
| R27 | sc around | 9 sc |
| R28 | (1 sc, 1 dec) | 6 sc |
| R29 | sc around, back loop only | 6 sc |
Thread the tapestry needle and weave through the front loop of each stitch in the last round; pull taut to close.
Leaves
Turn the tree upside down. Work into the front loops of Rounds 8, 12, 16, 24, and 28.
- R1: Join yarn in the front loop of the round; work (1 sc, 1 hdc, 2 dc in the same base st, 1 hdc, 2 sc) — repeat this sequence around.
- R2: (1 sc, 1 hdc, 2 dc in the same base st ×2, 1 hdc, 2 sc) — repeat this sequence around.
- R3: (8 hdc, 1 sc) — repeat this sequence around.
Repeat R1–R3 in the front loops of Rounds 12, 16, 20, 24, and 28.
Tree Vase — color #7030 Mustard
Make a magic ring.
| Round | Instruction | Stitch count |
|---|---|---|
| R1 | 6 sc inside the magic ring | 6 sc |
| R2 | 6 inc | 12 sc |
| R3 | (1 sc, 1 inc) around | 18 sc |
| R4 | (2 sc, 1 inc) around | 24 sc |
| R5 | (3 sc, 1 inc) around | 30 sc |
| R6 | 30 Bpsc | 30 sc |
| R7 | sc around | 30 sc |
| R8 | (9 sc, 1 inc) around | 33 sc |
| R9 | sc around | 33 sc |
Cut the plastic sheet to match the measurements of Rounds 1–5 and insert it into the piece.
| Round | Instruction | Stitch count |
|---|---|---|
| R10 | (10 sc, 1 inc) around | 36 sc |
| R11 | sc around | 36 sc |
| R12 | (11 sc, 1 inc) around | 39 sc |
| R13 | sc around | 39 sc |
| R14 | (12 sc, 1 inc) around | 42 sc |
| R15–17 | sc around (3 rounds) | 42 sc |
| R18 | 42 elongated sc worked between R15 and R16 | — |
Fasten off.
Trunk and Dirt — color #7567 Cocoa
Crochet in the round.
- Ch 12, close into a ring.
| Round | Instruction | Stitch count |
|---|---|---|
| R1 | 12 sc | 12 sc |
| R2–5 | sc around (4 rounds) | 12 sc |
Switch to color #7569 Brownie
| Round | Instruction | Stitch count |
|---|---|---|
| R6 | 12 inc, in the front loops only | 24 sc |
| R7 | (3 sc, 1 inc) around | 30 sc |
| R8 | (4 sc, 1 inc) around | 36 sc |
| R9 | (5 sc, 1 inc) around | 42 sc |
| R10 | sc around | 42 sc |
Fasten off, leaving a tail for sewing — but make the tree first.
Sew the dirt into the vase, onto the wrong side of Round 15 of the vase, then insert stuffing before finishing.
Ornaments — Amigurumi Sparkle #3528 Carmine
- R1: 7 sc inside a magic ring.
Fasten off. Sew or glue the ornaments onto the tree as shown in the reference photo.
Star — Amigurumi Sparkle #7030 Mustard
- R1: 5 sc inside a magic ring.
- R2: Repeat 5 times: ch 3, sk 1 ch, 1 sl st, 1 sc, 1 sl st in the next base stitch.
Fasten off and sew the star onto the top of the tree.
Assembly Notes
- Sew the beard onto the head, then the hat, then the glasses in black yarn.
- Sew the arms onto the body between R12 and R16.
- Sew the legs onto the body between R5 and R9.
- Sew the belt around the body.
- Assemble the tree: insert stuffing and dirt into the vase, sew the tree trunk into the vase, and attach the star and ornaments last.
Frequently Asked Questions
What size is the finished Santa Claus and Christmas tree amigurumi? The finished Christmas tree measures about 8 inches tall, and Santa Claus measures about 5.5 inches. Actual size can vary slightly depending on yarn weight, hook size, and individual tension.
What yarn and hook size does this pattern use? This pattern uses Circulo Amigurumi and Amigurumi Sparkle yarns with a size C crochet hook. Substituting a similar weight yarn will work, but the finished size and stitch definition may change slightly.
What skill level is this crochet pattern suited for? This is an intermediate-level pattern (difficulty ●●○), best suited to crocheters who are already comfortable with amigurumi basics like magic rings, invisible decreases, working in the back/front loop only, and sewing pieces together.
How do I get the color-block effect on Santa’s hat and arms? Color changes happen mid-piece by switching yarn at the start of a new round — for example, the hat starts in white, switches to carmine for the body of the hat, then finishes in white for the brim. Simply drop the old color, join the new one, and continue single crocheting in the round.
Can I use safety eyes other than 8mm blue? Yes — safety eye size and color come down to personal preference and what best matches your desired look. Just make sure to attach them before closing up the head, since they can’t be added afterward.
Do I need a plastic sheet for the tree vase? The plastic sheet is inserted into the base of the vase (matching the size of Rounds 1–5) to help the vase hold its shape and stand upright with the weight of the tree. It’s optional but recommended for a sturdier finished piece.
How do I attach the beard, hat, and arms to Santa’s head and body? Each piece is crocheted separately and then hand-sewn into place using a tapestry needle and matching yarn, following the placement guide in the reference photo — the beard and hat go on the head, and the arms and legs attach to the body at the rounds specified in the pattern.
